
Rate Limit Users (ratelimiter)
ratelimiter is an advanced and flexible middleware for the grammY framework, designed to protect Telegram bots from spam and resource abuse.

At its core, ratelimiter acts as a configurable gatekeeper for incoming updates. It allows developers to define precise rules for how many messages a user or chat (or any arbitrary entity) can send in a given period, ensuring the bot remains responsive and server resources are protected from overload.
The plugin inspects each incoming message, identifies its source, and decides if it should be processed or dismissed based on the rules you set.
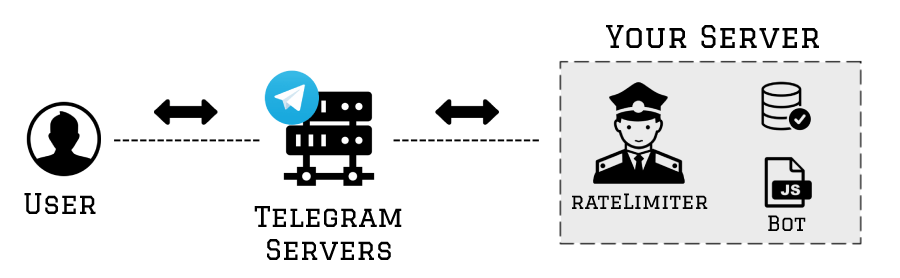
Rate-Limiting Users, Not Telegram Servers!
It is crucial to understand that this plugin DOES NOT block requests from Telegram’s servers. Instead, it identifies the source of an update (like a user or a chat) and makes a decision within the bot’s code before any heavy processing begins. If a user is spamming, their messages are dismissed instantly, saving valuable server resources.
Quickstart: Basic Configuration
The following demonstrates the easiest way to begin using the RateLimiter. This basic setup will protect your bot from the most common types of spam.
1. Create a Storage Engine
The storage engine is the limiter’s persistence layer, responsible for tracking recent activity. For development and most standard use cases, the Memory is sufficient.
Create Once, Share Everywhere
It is a recommended best practice to create only one storage instance for your entire bot and share it across all your rate-limiting rules. This ensures efficiency and state consistency.
2. Build Your Rule
The new fluent API is used to construct rules. All rules are initialized with new Limiter() and configured by chaining methods.
3. Apply the Middleware
The configured rule is then passed to the limit() middleware function and registered with the bot via bot.
import { Bot, Context } from "grammy";
import { limit, Limiter } from "@grammyjs/ratelimiter";
import { MemoryStore } from "@grammyjs/ratelimiter/storages";

const bot = new Bot(""); // <-- Put your bot token here

// 1. Create a storage instance.
const storage = new MemoryStore();

// 2. Build the rule with the fluent API.
const limiter = new Limiter<Context>()
  // Use the Token Bucket algorithm (recommended).
  .tokenBucket({
    bucketSize: 5, // Allow a user to send a burst of 5 messages...
    tokensPerInterval: 2, // ...then refill 2 tokens every 3 seconds.
    interval: 3000,
  })
  .limitFor("user") // Limit each user individually.
  .useStorage(storage); // Use the memory store.

// 3. Apply the middleware.
bot.use(limit(limiter));

bot.command("start", (ctx) => ctx.reply("Welcome!"));
bot.on("message", (ctx) => ctx.reply("Message received!"));

bot.start();import { Bot, type Context } from "https://deno.land/x/grammy@v1.44.0/mod.ts";
import { limit, Limiter } from "https://deno.land/x/grammy_ratelimiter@v1.2.1/mod.ts";
import { MemoryStore } from "https://deno.land/x/grammy_ratelimiter@v1.2.1/storages.ts";
const bot = new Bot(""); // <-- Put your bot token here
// 1. Create a storage instance.
const storage = new MemoryStore();
// 2. Build the rule with the fluent API.
const limiter = new Limiter<Context>()
.tokenBucket({
bucketSize: 5,
tokensPerInterval: 2,
interval: 3000,
})
.limitFor("user")
.useStorage(storage);
// 3. Apply the middleware.
bot.use(limit(limiter));
bot.command("start", (ctx) => ctx.reply("Welcome!"));
bot.on("message", (ctx) => ctx.reply("Message received!"));
bot.start();With this setup, your bot is now protected by a smart, burst-friendly rate limit for every user.
The Fluent API
The Limiter builder is the heart of the plugin. Let’s explore each of its powerful methods.
Limiting Strategies: How to Count
A strategy is the algorithm used to enforce a limit.
.tokenBucket() (Recommended)
This is the most advanced and user-friendly strategy. It models a bucket of “tokens” for each user.
bucket: The maximum number of tokens the bucket can hold. This defines the user’s burst limit.Size interval: The time period (in milliseconds) over which tokens are refilled.tokens: The number of tokens added to the bucket during each interval. This defines the sustained rate.Per Interval
This algorithm allows users who have been inactive to send a quick burst of messages, which provides a more natural user experience.
import type { Context } from "grammy";
import { Limiter } from "@grammyjs/ratelimiter";

// Allow a burst of 10 messages.
// Afterwards, the user's limit refills at a rate of 3 tokens per 5 seconds.
new Limiter<Context>().tokenBucket({
  bucketSize: 10,
  tokensPerInterval: 3,
  interval: 5000,
});.fixedWindow()
This is a simpler, more traditional strategy. It counts the number of requests received within a sliding time frame.
limit: The maximum number of requests allowed in the window.time: The duration of the window in milliseconds.Frame
This strategy is stricter and is useful for actions that should have a hard, predictable cap.
import type { Context } from "grammy";
import { Limiter } from "@grammyjs/ratelimiter";

// Allow exactly 1 request every 30 seconds.
new Limiter<Context>().fixedWindow({
  limit: 1,
  timeFrame: 30_000,
});Fixed Window vs Token Bucket: Real World Implications
I would like to explain two real-world scenarios where these two strategies make an actual difference.
Imagine you set a limit of 3 request per 10 seconds using the fixed window strategy. If a user uses 3 requests in the first second, they have to wait 9 seconds just to send one more request. This is not the most optimal user experience. Had you have used the token bucket strategy, the tokens would refill (for instance every 1 second) which allowed our imaginary user to have sent another request in the next second.
Another scenario is burst control. Let’s go back to the 3 requests per 10 seconds example. Via a fixed window strategy, a malicious user could wait until second 9 and send 3 requests. Then the 10th second arrives and the limit reset which means they can send another 3 requests. They were effective able to send 6 requests per 2 seconds! For one user this is not a big deal but if we are targeted by a cohort of malicious accounts, this could make a whole lot of difference.
Storage: Where to Count
You must provide a storage engine to the limiter using .use.
new Memory: Stores data in the bot’s RAM. It is fast and simple, but all data is lost on server/bot restart.Store() new Redis: Uses Redis for persistent, shared storage. This is essential for production bots, especially those running in a cluster. See the Production Guide: Using Redis section for a detailed guide.Store(client)
Scope: Who to Count
With .limit, you define the entity to which the limit is applied.
.limit: Limits each user individually based on theirFor('user') from. This is the most common configuration..id .limit: Limits the entire chat based on itsFor('chat') chat. This is useful for preventing spam in a group chat..id .limit: Applies a single limit to the entire bot. This is a powerful tool to protect against high traffic spikes or to control the bot’s overall API usage. Be very careful about choosing this option!For('global') - Custom Function: For ultimate control, you can provide a function that returns a unique string key. The limiter will be applied to whatever entity that key represents.
Example: A custom key per command for each user
This rule limits a user to 5 uses of /commandA and 5 uses of /commandB per minute, with each command’s limit counted separately.
import type { Context } from "grammy";
import { Limiter } from "@grammyjs/ratelimiter";

new Limiter<Context>().limitFor((ctx) => {
  const userId = ctx.from?.id;
  const command = ctx.message?.text?.split(" "); // e.g., "/commandA"

  if (userId && command) {
    return `${userId}:${command}`;
  }
});Key Prefix: .withKeyPrefix()
IMPORTANT: Using Multiple Limiter Rules
When using more than one limiter rule in your bot, you must assign a unique key prefix to each one using .with.
Failing to do so will cause different rules to read and write to the same location in your storage. This can lead to unexpected behavior (incorrect limits) or crashes when different strategies (e.g., fixed and token) are used on the same entity. The key prefix ensures each rule has its own isolated data.
import type { Context } from "grammy";
import { Limiter } from "@grammyjs/ratelimiter";

// BAD: Two rules without prefixes will collide in storage.
const messageLimiter = new Limiter<Context>()...
const commandLimiter = new Limiter<Context>()...

// GOOD: Each rule has its own namespace.
const messageLimiter = new Limiter<Context>().withKeyPrefix("message")...
const commandLimiter = new Limiter<Context>().withKeyPrefix("command")...If you cause any collisions, debugging would be your rage quit moment in larger bots with thousands of keys.
Advanced Features
The following features provide granular control over your bot’s rate-limiting behavior.
Conditional Limiting: .onlyIf()
The .only method allows a limit to be applied only under specific conditions. It accepts a predicate function that returns true if the limiter should run for the current update, and false if it should be skipped.
Example: Only limit users when they send stickers
import type { Context } from "grammy";
import { Limiter } from "@grammyjs/ratelimiter";

new Limiter<Context>()
  .fixedWindow({ limit: 5, timeFrame: 60_000 }) // 5 stickers per minute
.onlyIf((ctx) => ctx.message?.sticker !== undefined); // Run only for stickersHandling Throttled Users: .onThrottled()
The .on method allows you to define a callback function that executes when a user is being throttled.
The callback receives three arguments:
ctx: The grammY context object.info: An object with details about the limit (infois the time in milliseconds until the user’s limit resets)..reset storage: The storage engine instance, for advanced use cases like notification locks.
Example: A simple (but unsafe) reply
import type { Context } from "grammy";
import { Limiter } from "@grammyjs/ratelimiter";

new Limiter<Context>().onThrottled(async (ctx, info) => {
  const remainingSeconds = Math.ceil(info.reset / 1000);
  await ctx.reply(
    `You are sending messages too fast! Please wait ${remainingSeconds} seconds.`,
  );
});Controlling onThrottled : The “Reply Once” Pattern
It is critical to understand the behavior of the .on callback: it will execute for every throttled request.
Beware the “Reply Flood”!
If your .on callback sends a reply like the simple example above, you can accidentally create a “reply flood.” A spammer sending 50 messages could cause your bot to try and send 50 replies, which could get your bot rate-limited by Telegram’s servers — the very problem we’re trying to solve!
To safely notify a user only once per throttled period, you must implement a “notification lock.” Here are two clear, production-safe patterns for doing so.
Method 1: The info Object (For Fixed Window)
For the Fixed, you can use the state provided in the info object to reply only on the very first throttled request. This is the most efficient method for this strategy as it requires no extra storage calls. Let’s say your limit is 5. The 6th request is the first to be throttled, at which point info will equal -1.
import type { Context } from "grammy";
import { Limiter } from "@grammyjs/ratelimiter";

const MY_LIMIT = 5;

new Limiter<Context>().fixedWindow({ limit: MY_LIMIT, timeFrame: 60_000 })
  .onThrottled(
    async (ctx, info) => {
      // Check if this is the first throttled request in the window.
      if (info.remaining === -1) {
        const remainingSeconds = Math.ceil(info.reset / 1000);

        await ctx.reply(
          `You have hit the limit. Please wait ${remainingSeconds} seconds.`,
        );
      }
      // For all subsequent throttled requests (remaining < -1), this block is skipped.
    },
);Method 2: The Notification Lock (Universal Solution)
The Token’s state is continuous and doesn’t have a simple “first throttled” signal. For this, and for a pattern that works universally across all strategies, the notification lock is the fix-all solution. This pattern uses the storage engine to set a temporary flag indicating that we’ve already notified the user.
import type { Context } from "grammy";
import { Limiter } from "@grammyjs/ratelimiter";

new Limiter<Context>()
  .tokenBucket({ bucketSize: 10, tokensPerInterval: 3, interval: 3000 })
  .onThrottled(async (ctx, info, storage) => { // <-- `storage` is passed
    const userId = ctx.from?.id;
    if (!userId) return; // Cannot create a lock without a user ID

    const notificationKey = `notify-lock:${userId}`;
    const hasBeenNotified = await storage.checkPenalty(notificationKey);

    if (!hasBeenNotified) {
      const remainingSeconds = Math.ceil(info.reset / 1000);

      await ctx.reply(
        `You are sending messages too fast! Please wait ${remainingSeconds} seconds.`,
      );

      // Set the lock with a 60-second TTL.
      await storage.setPenalty(notificationKey, 60_000);
    }
});RateLimiter Storage Argument
storage is passed in as the 3rd argument for all on methods regardless of the strategy. It is a general purpose storage engine with not much exclusive ties with the RateLimiter package, meaning you may choose to do whatever you want with it!
This is the same storage object you have passed to the .use.
Dynamic Limits
This feature allows for different rate limits for different users within a single rule.
Supported Strategy: fixedWindow
The .fixed strategy supports a dynamic limit generator. Instead of passing a fixed number to the limit property, you can pass a function that receives the ctx object and returns the appropriate limit.
Example: Give chat admins a higher limit
import type { Context } from "grammy";
import { Limiter } from "@grammyjs/ratelimiter";

async function isAdmin(ctx: Context) {
  if (!ctx.chat || ctx.chat.type === "private") return false;
  const user = await ctx.getChatMember(ctx.from.id);
  return ["creator", "administrator"].includes(user.status);
}

new Limiter<Context>().fixedWindow({
  // `limit` is now a function that returns a number.
  limit: async (ctx) => ((await isAdmin(ctx)) ? 100 : 5),
  timeFrame: 60_000,
});Limitation for Token Bucket Strategy
The dynamic feature is currently exclusive to the .fixed strategy. The reason for this is ambiguity: a single number has a clear meaning for a fixed window’s limit, but it would be unclear how to apply it to a token bucket’s three interdependent parameters (bucket, interval, tokens).
However, it is possible to achieve similar dynamic behavior for token buckets by composing multiple, separate rules and using .only to select the appropriate one for the context.
import { Bot, type Context } from "grammy";
import { limit, Limiter } from "@grammyjs/ratelimiter";

declare const bot: Bot;
declare function isAdmin(ctx: Context): Promise<boolean>;

// Rule for regular users
bot.use(limit(
  new Limiter<Context>()
    .tokenBucket({ bucketSize: 5, tokensPerInterval: 2, interval: 3000 })
    .onlyIf((ctx) => !isAdmin(ctx)),
));

// A separate, more generous rule for admins
bot.use(limit(
  new Limiter<Context>()
    .tokenBucket({ bucketSize: 100, tokensPerInterval: 50, interval: 1000 })
    .onlyIf((ctx) => isAdmin(ctx)),
));The Penalty Box: .withPenalty()
For persistent spammers, the Penalty Box feature allows you to temporarily “mute” a user for a set duration if they hit the limit. During this mute, all of their messages for that rule are instantly ignored, providing an efficient way to handle abuse.
penalty: The duration of the mute (in ms). This can be a fixed number or a dynamic function.Time
Example: Mute a user and increase the penalty for repeat offenses
import type { Context } from "grammy";
import { Limiter } from "@grammyjs/ratelimiter";

// For a production bot, this state should be stored in a proper database.
const penaltyCounts = new Map<number, number>();

new Limiter<Context>().withPenalty({
  penaltyTime: (ctx, info) => {
    const userId = ctx.from.id;
    const count = (penaltyCounts.get(userId) ?? 0) + 1;
    penaltyCounts.set(userId, count);

    // Mute for 30s, then 5m, then 1hr.
    if (count === 1) return 30_000;
    if (count === 2) return 300_000;
    return 3_600_000;
  },
});Observability: The Event Emitter
For advanced logging, analytics, or monitoring, you can listen to events that the limiter emits using the .on() method. This is an opt-in feature for observing the limiter’s internal behavior.
Available Events:
allowed:- Fired when a request is allowed.[ctx , info] throttled:- Fired when a request is rate-limited.[ctx , info] penalty- Fired when a user is put in the Penalty Box.Applied: [ctx , key , duration]
Example: Logging penalties
import { Bot, type Context } from "grammy";
import { limit, Limiter } from "@grammyjs/ratelimiter";

declare const bot: Bot;

const commandLimiter = new Limiter<Context>().fixedWindow({
  limit: 1,
  timeFrame: 10_000,
}).withPenalty({ penaltyTime: 30_000 });

commandLimiter.on("penaltyApplied", (ctx, key, duration) => {
  console.warn(
    `[ABUSE] User with key ${key} (ID: ${ctx.from?.id}) was penalized for ${duration}ms.`,
  );
});

// Important: Pass the limiter instance itself to `limit()` to keep listeners attached.
bot.use(limit(commandLimiter));Production Guide: Using Redis
For any production bot, especially one running on multiple servers (a cluster), using Redis for storage is essential. It provides a persistent, shared state for all bot instances.
How It Works: The IRedisClient Contract
To use our Redis, you must provide an object that fulfills the IRedis interface. This driver-agnostic approach gives you complete freedom to choose your favorite Redis library.
Here is the contract your object must satisfy:
export interface IRedisClient {
  /**
   * Loads a Lua script into the Redis script cache and returns its SHA1 hash.
   * Corresponds to the `SCRIPT LOAD` command.
   *
   * Note: If your client doesn't expose scriptLoad directly, you can implement
   * it using eval: `eval("return redis.call('SCRIPT', 'LOAD', ARGV)", [], [script])`
   */
  scriptLoad(script: string): Promise<string>;

  /**
   * Executes a pre-loaded Lua script by its SHA1 hash.
   * Corresponds to the `EVALSHA` command.
   *
   * @param sha The SHA1 hash of the loaded script.
   * @param keys Array of Redis keys (becomes KEYS[] in Lua).
   * @param args Array of arguments (becomes ARGV[] in Lua) - should be a flat array like `[ttl]`.
   */
  evalsha(
    sha: string,
    keys: string[],
    args: (string | number)[],
  ): Promise<unknown>;

  /** Retrieves a value for a key. Corresponds to `GET`. */
  get(key: string): Promise<string | null>;

  /**
   * Sets a key with a value and millisecond expiry.
   * Should be equivalent to `SET key value PX ttlMilliseconds`.
   *
   * Implementation examples:
   * - ioredis: `set(key, value, 'PX', ttlMilliseconds)`
   * - node-redis: `pSetEx(key, ttlMilliseconds, value)`
   * - deno-redis: `set(key, value, { px: ttlMilliseconds })`
   */
  setWithExpiry(
    key: string,
    value: string,
    ttlMilliseconds: number,
  ): Promise<unknown>;

  /** Checks for the existence of a key. Corresponds to `EXISTS`. */
  exists(key: string): Promise<number>;

  /** Deletes a key. Corresponds to `DEL`. */
  del(key: string): Promise<unknown>;
}Easy Setup for Popular Clients
Most popular Redis libraries are structurally compatible. You only need to use a type assertion to satisfy TypeScript.
import type { Context } from "grammy";
import { Limiter } from "@grammyjs/ratelimiter";
import { type IRedisClient, RedisStore } from "@grammyjs/ratelimiter/storages";
import Ioredis from "ioredis";

// 1. Create your ioredis client.
const ioredisClient = new Ioredis();

// 2. The ioredis instance is structurally compatible.
//    Just cast it to our interface to satisfy TypeScript.
const storage = new RedisStore(ioredisClient as unknown as IRedisClient);

// 3. Use it in your limiter.
new Limiter<Context>().useStorage(storage);import type { Context } from "https://deno.land/x/grammy@v1.44.0/mod.ts";
import { Limiter } from "https://deno.land/x/grammy_ratelimiter@v1.2.1/mod.ts";
import {
type IRedisClient,
RedisStore,
} from "https://deno.land/x/grammy_ratelimiter@v1.2.1/storages.ts";
import { connect } from "https://deno.land/x/redis/mod.ts";
// 1. Create your deno-redis client.
const denoRedisClient = await connect({ hostname: "127.0.0.1" });
// 2. The client is compatible, just cast it.
const storage = new RedisStore(denoRedisClient as unknown as IRedisClient);
// 3. Use it in your limiter.
new Limiter<Context>().useStorage(storage);The examples above demonstrate that popular clients like ioredis and deno are structurally compatible with the IRedis interface at the time of writing.
However, since library APIs can change over time, the most future-proof way to ensure compatibility is to use the adapter pattern described in the next section. While casting with as works for compatible clients, creating a simple adapter object explicitly maps your client’s methods to our interface, guaranteeing that your code will not break silently even if the underlying Redis library changes its method names in a future update.
Advanced: Manually Adapting Other Clients
If your Redis client has different method names, you can easily create an adapter object.
Example: Adapting a fictional weird client
import type { IRedisClient } from "@grammyjs/ratelimiter/storages";
import { RedisStore } from "@grammyjs/ratelimiter/storages";

class WeirdRedisClient {
  weirdLoad(script: string): Promise<string> {
    // some implementation
  }
  weirdRun(
    sha: string,
    params: { keys: string[]; args: (string | number)[] },
  ): Promise<unknown> {
    // some implementation
  }
  // ... other different methods
}

const myClient = new WeirdRedisClient();

// Create an adapter object that maps your client's methods to ratelimiter's interface.
const myAdapter: IRedisClient = {
  scriptLoad: (script) => myClient.weirdLoad(script),
  evalsha: (sha, keys, args) => myClient.weirdRun(sha, { keys, args }),
  get: (key) => myClient.weirdFetch(key),
  setWithExpiry: (key, value, ttl) =>
    myClient.weirdSet(key, value, { ms: ttl }),
  // ... and so on for exists and del.
};

// Now the RedisStore can use your custom client!
const storage = new RedisStore(myAdapter);This adapter pattern ensures maximum flexibility for any Redis setup.
Best Practices for Larger Bots
As your bot grows in complexity, placing all configuration directly in your main bot file can reduce readability. It is a recommended best practice to move your RateLimiter setup to a separate file, following the principle of Separation of Concerns.
Proposed Project Structure
.
└── src/
    ├── bot.ts           # Your main bot file (imports and starts the bot)
    └── middlewares/
        └── ratelimiter.ts # All RateLimiter setup goes here
Step 1: Create the Limiter Configuration File
This file will be the single source of truth for all your rate-limiting rules.
File: src
import { type Context } from "grammy";
import { limit, Limiter } from '@grammyjs/ratelimiter';
import { RedisStore, type IRedisClient } from '@grammyjs/ratelimiter/storages';
import Ioredis from 'ioredis';

const ioredisClient = new Ioredis();
const storage = new RedisStore(ioredisClient as unknown as IRedisClient);

// Define all your rules here...
const globalLimiter = new Limiter<Context>()...
const imagineLimiter = new Limiter<Context>()...
const privateChatLimiter = new Limiter<Context>()...

// Set up event listeners...
imagineLimiter.on('penaltyApplied', ...);

// Export the configured middleware, ready to use.
export const rateLimiters = [
  limit(globalLimiter),
  limit(imagineLimiter),
  limit(privateChatLimiter.build()),
];Step 2: Apply the Middleware in Your Main Bot File
Now, your main bot file becomes incredibly clean.
File: src
import { Bot } from "grammy";
import { rateLimiters } from "./middleware/ratelimiter.ts"; // Import our setup

const bot = new Bot(""); // <-- Put your bot token here

// Apply all RateLimiter middlewares at once.
bot.use(...rateLimiters);

// Your bot's business logic remains clean and focused.
bot.command("start", (ctx) => ctx.reply("Welcome!"));
// ...

bot.start();Adopting this pattern makes your projects well-organized, scalable, and easier to maintain.